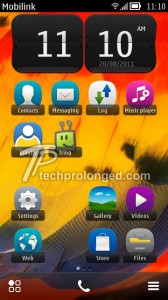
 The big news was to hear about Symbian Belle leaked just before the official release of Symbian Anna. But I didn’t try that as well on the spot, I seriously had lost interest in the updates. Symbian Anna was officially release just after two days when I upgraded to it via Nokia Software Updater. But then I just couldn’t resist giving my N8 one more job to wear the Belle Cloths. I had firmware files from the day one when the Belle got leaked. Only what I didn’t get was the interest and time.
UPDATE February 7, 2012: The official Nokia Belle has been released for existing Symbian^3 and Anna devices. If your device is listed to receive Nokia Belle update then you should update via Nokia Suite.
UPDATE December 20, 2011: Flashing or Upgrading to Symbian Belle v111.030.0609 is straight forward. See this post to upgrade.
UPDATE: This post has been updated to help with easy method to get your N8 ready for flashing. Only two steps are updated, step 4 and the step when the error message appears after clicking “Refurbish”.
Previous instructions are also there but have been
stroke-through
. New instructions are starting with the word “UPDATE:”. Hope you will find this change helpful if you have not been able to do with previous instructions.
UPDATE November 14: As newer version of Symbian Belle v111.030.0607 has been leaked. The following tutorial is not recommended to use with this new leaked version. To upgrade to latest Symbian Belle 111.030.0607 is simple and straight forward.
You must keep me not responsible for any loss of yours if it happens. “Flashing” is not a recommended task, so be fully responsible while you do it. Also note that, it will void the warranty of the device.
Upgrading to Symbian Belle is just 5 min job (could be 10 minutes if doing it first time.) But going through this post and reading it all must take some time that make sure you understand how to do it.
DISCLAIMER: We at www.nokiabelleupdates.blogspot.com do not recommend flashing/refurbishing ormanually installing official/custom/hacked firmwares on your devices. Hence we make tutorials in detail to be helpful for you to experiment with new softwares. That said; You are the only one who will be responsible for any loss or damage caused to your devices.
Follow the instructions accurately as I tell here and you should not get any trouble with it. But proceed with responsibility.
Do not attempt any thing until you read the following instructions in full.
Prepare with the following things:
- Check that you really have a Nokia N8 with you ;-)
- Phoenix Service Software. Download from here.
- Symbian Belle firmware files. Download from here. (Archive password: orvvan + mohamad 79)
(Copy all of 4 files to anywhere on your hard disk in a folder)> RM-596_111.010.0606_79u_prd.core.fpsx> RM-596_111.010.0606_13.01_MEA_A_79u_prd.rofs2.fpsx> RM-596_111.010.0606_C04.01_MEA_1_79u_prd.rofs3.fpsx> RM-596_111.010.0606_U07.01_79u.uda.fpsx
- Symbian Anna firmware files. (You might already have them if you have upgraded to Symbian Anna)- If you have these firmware files, you can skip the remaining parts below with (*).
* If you upgraded to Symbian Anna (leaked) manually some time before the official roll-out, you will know where the Anna files you kept. Get them.
* If you have recently upgraded to official Symbian Anna via Ovi Suite or via Nokia Software Updater, you don’t need to look around on the internet to get the files.
** Ovi Suite stores the downloaded firmware files on the hard disk.
**** In Windows 7, find them at [C:\ProgramData\Nokia\Nokia Service Layer\A\nsl_service_module_00001\vpls\www.dsut.online.nokia.com.oti.caresuite\Products\rm-596]
** Nokia Software Updater also stores the downloaded firmware files on the hard disk.
**** In Windows 7, find them at[C:\Users\%WINDOWS_USER%\AppData\Local\Nokia\NSU3\NOSSU2\variants\Products\rm-596]
——- (in above path NSU3 and NOSSU2 are version based. Use common sense.)
* If you can’t find the Symbian Anna files on your computer’s hard disk, then you will need to download them now. Use Navifirm Software to download Symbian Anna firmware files for your N8. Click here to download Navifirm.
(If you don’t know how to use Navifirm, then run Navifirm and Go through this screen.)
(UPDATED) OR you can download a leaked/custom Anna Firmware from here. We have posted about Symbian Anna leaked firmware months ago.
The Process
Now make sure that you have everything above ready. Follow as below.
The version of Phoenix Software I used in this tutorial was 2011.02.000.44842, the same as linked above for you to download. If you already have another version of Phoenix, you can also use that but the screen shots listed below, as were taken from version 2011.02.000.44842, can be a bit different than yours. But you still should be able to follow the steps.
Again! read all of the steps in full before you start with it, so that you will be aware of everything which is going to be in your way. I always do it as it helps doing the job more accurately.
You might want to check out our video demonstration to upgrade Nokia N8 to Symbian Belle.
Check it out here.
- Run the Phoenix Software.
- Go to Tools > Options > Product Locations – You should see a dialog window like below. Read the directory path in [Data package 1] Close the window after noticing the path, we don’t need this window any more.
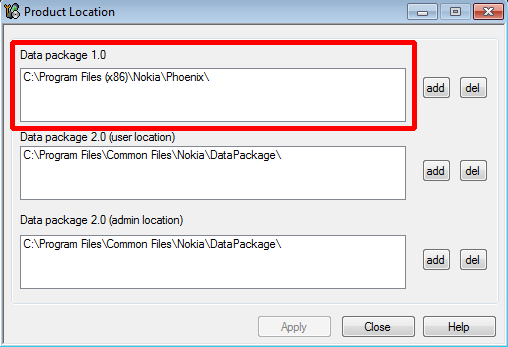
- [C:\Program Files (x86)\Nokia\Phoenix] in above example. Locate the path on your computer and Copy the Symbian Anna files in C:\Program Files (x86)\Nokia\Phoenix\Products\RM-596\* Common Sense: “Program Files (x86)” is due to Windows 7 64-bit used. Windows XP or any Windows 32-bit will load the path as “Program Files”. The thing to consider is that the path specified in Phoenix should be the path on your Hard Disk Drive containing the Symbian Anna firmware files, or other wise the the Flashing process couldn’t be started.
* You might need to create folders “Products” and/or “RM-596″ if not existed already in as the path above.
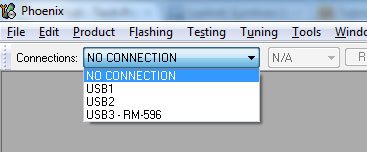
Now connect your Nokia N8 with stock USB Cable to your computer [in Ovi Suite Mode]. Close the Ovi Suite if it is open.UPDATE: Make sure your Nokia N8 is turned off. Now connect your N8 with stock USB Cable to your computer and wait for a second or two until it goes in charging mode. Once it’s in charging mode, Press power button and hold it down for 8 seconds or until it vibrates three times. (Now make sure that the charging indicator besides USB port on N8 is not lighten up or is not blinking and the screen is totally black. Now continue as following)- In Phoenix, choose “No Connection” in Connections as below
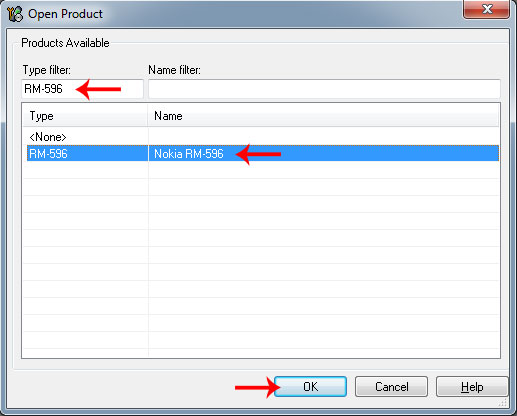
- In File menu, click “Open Product”.When the “Open Product” window appears, type “RM-596″ to filter and choose it from the list as shown below. Then click OK.
- Go to “Flashing” in menu and choose “Firmware Update”.
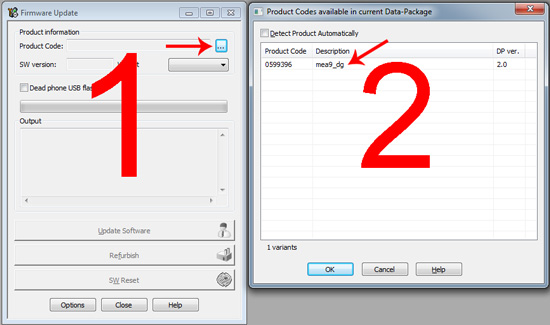
In “Firmware Update” window click the button as shown with a red arrow in image 1. Now choose the entry in “Product Codes” window. And click OK
* This will be the product entry for Symbian Anna you have placed into the path (in Step-3 above). The Symbian Anna firmware files I chose were the official Symbian Anna. So it might be different at your end with your Anna firmware files. Whatever it is either the official or the manually downloaded leaked Symbian Anna, choose it.
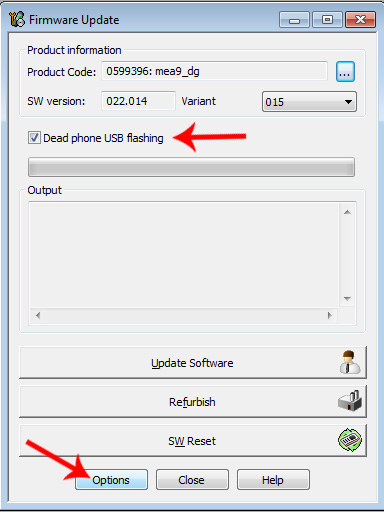
- Once you’ve chosen the product entry in above image-2, the product information will be populated in “Firmware Update” window as below. Make sure you “Check” the “Dead phone USB flashing”. Now click “Options”.
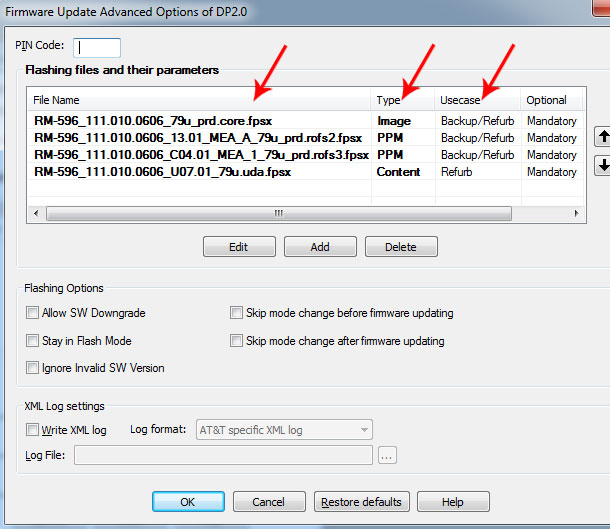
- Once you clicked “Options”, following screen “Firmware Update Advanced Options” should appear with Symbian Anna files loaded. You must need to replace the files from Symbian Anna to Symbian Belle as shown in 2nd screen below.
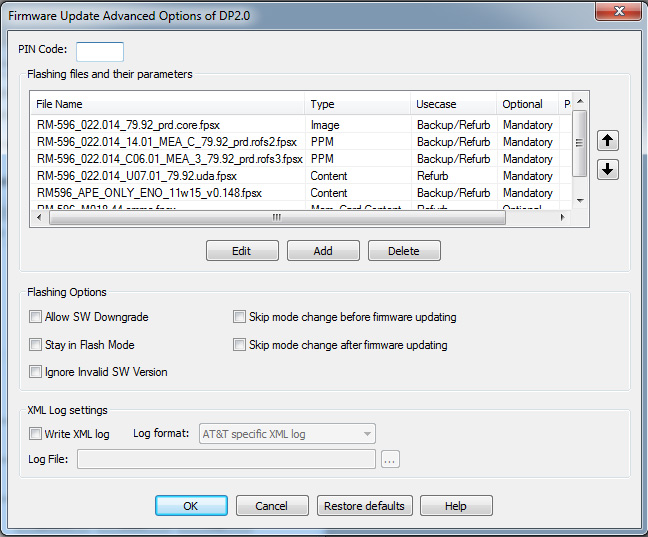
You can select an entry in from the list and click “Edit” button to replace the file another.

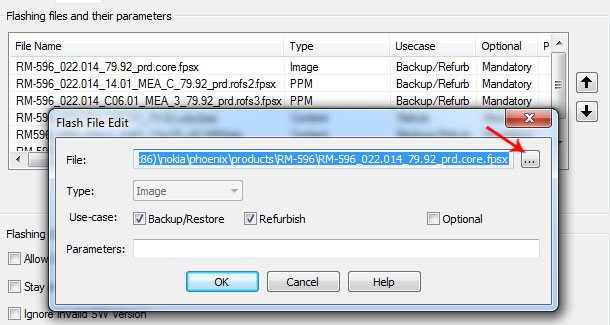
Clicking “Edit” above will popup another dialog like below where you can replace the selected file by browsing through.
Click the button with three dots [...] (pointed with a red arrow) and then locate the Symbian Belle file as shown in above image. e.g. *.core.fpsx must be replaced with *.core.fpsx from Symbian Belle files.
Repeat the step with all four files as pointed with arrows above. Do not change any other option.
*.rofs2.fpsx to be replaced with *.rofs2.fpsx from Symbian Belle files.
*.rofs3.fpsx to be replaced with *.rofs3.fpsx
*.uda.fpsx to be replaced with *.uda.fpsx from Symbian Belle files.
And delete the remaining two entries.
After performing replacement and deleting two entries, you should see only four files in the list and those must be of Symbian Belle. See below. Confirm the values under under arrows.
- When done, Click OK in
And then Click “Refurbish” in “Firmware Update” as below window.
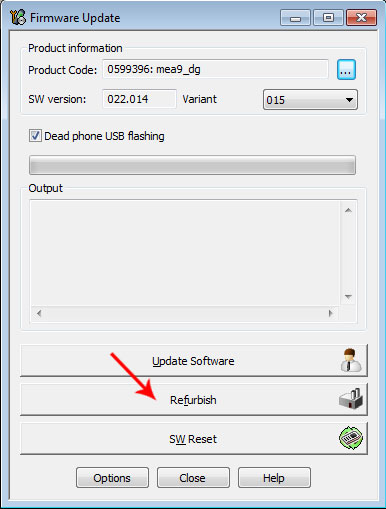
The process will be started, just sit back and wait for a few minutes while the flashing of Symbian Belle completes.
NOTE: After clicking
“Refurbish” you might see an error message from Phoenix like below
You might need to repeat this step more than once, if you do not do it correctly. But don’t panic, you will do it in a few times if not in one try.
If you see this error, do as following. (Explained thoroughly)
Disconnect the USB cable.Make sure the device is turned offWhen it’s off, press power button (it will vibrate once) but keep holding the power button for 8 more seconds (it will vibrate again thrice).Connect the USB cable again.Click OK
Flashing should continue if you did it right, or other wise repeat the steps until it works. (If your device goes on charging, the flashing will not start and you’ll need to repeat above 5 steps)
UPDATE: If you see an error like above – (Before continuing, please note that at this stage your N8 is supposed to be in turned-off state, not in charging mode and connected to the computer - since the step 4). OK Now! Do not disconnect the USB Cable. Just press the power button once and leave (do not hold it down, just press and leave so that your device should not start). You will see that the flashing will start on the back of the error message (on “Firmware update” window on the back of the error message). You can close the error message now by clicking any of the buttons, OK, Cancel or Cross and wait for the flashing to finish on “Firmware update” window.
— I hope this will help more than before —-


.jpg)
.jpg)
.jpg)
.jpg)
.jpg)
.jpg)
.jpg)
.jpg)
.jpg)
.jpg)
.jpg)

.jpg)


+nokiavnn.com.jpg)

.jpg)


